If I would have had more time available I would liked to have spend more time on certain areas of the assignment.
The first would be taking more time texturing my X Wing and the Tie Fighter as they use textures that have purely been samples from the internet or drawn on in Photoshop, I would like to have added much more detail to the textures and use similar techniques that I used on the Death Star like the bump map to create a much more realistic look of the metals and parts of the body. Putting textures on to the faces gives a good effect but as soon as the model is seen in detail it is clear that the faces are flat and they don't look very realistic.
The second would be to spend more time working on the detail inside the trench of the Death Star as when it is seen through the animation it is obvious that it isn't a rounded shape and you can clearly see where the faces change angle. Also I really wanted to give it an uneven effect like it does in the film with the walls being jagged and made up of square blocks. The trench was also meant to include stationary guns that should have been firing at the X Wing but again I just didn't have the time to create any.
The Third thing I would have liked to spend more time on was adding lighting to the scenes as I didn't actually use any lighting apart from the default ones. Once again it was a matter of time and I felt that the default lighting was good enough for what I needed in the animation. One problem I noticed with the default lighting was the fact that it appeared far more lighter in the render than it did while creating the animation. It is very misleading as some scenes look fine but others can suddenly change.
Overall I learnt a lot about how to use the software and I have gone from knowing absolutely nothing to being able to design, texture and animate short animations. I wouldn't say that I particularly enjoyed modeling as it can be a very long and tedious task which I can get angry with very quickly but It was very interesting to learn how animation is created and I now look at the animated films in a very different way, constantly thinking about camera angles and why certain things are filmed in certain ways.
Friday 16 December 2011
Final 30 second clip
The Final Result
Now I had 5 clips ready to be put together.
I chose to use Adobe Premier Pro to do this as I have previous experience with this software and it didn't need anything special doing to it.
I added all the videos together on the time line and chose to add some dramatic Star Wars themes background music to is as well as laser sound effects where the lasers were fired in the animation.

I also added two cross fades at the end of the video and the background music just so it wouldn't suddenly stop at the end.
This gave me my finished video.
Wednesday 14 December 2011
Issues with rendering
Rendering Problems
I chose to render five separate files, I did it this way because I could check each part of the animation without having to do a much larger render just to check one problem. Also doing it this way meant I could use one camera at a time and keep each animation separate in-case I needed to change anything.
One major problem I ran into while rendering was controlling the aspect ratio, no matter what resolution I seemed to set the final .avi file would always be 4:3 instead of 16:9, even if the resolution was a widescreen resolution it would then just squash it into a 4:3 format.
The only way I managed to get around this problem was to render it in 1280 x 720 High Definition format and use an uncompressed video codec to export it.
This was a time consuming method of rendering the animations and still left me with problems such as the video files were far too large ( 8 Seconds = 900mb ) this caused problems for my computer as it couldn't keep up with the shire amount of data needing to be processed to play just 8 seconds of footage ( and my computer is Full HD and plays Blu-rays.)
To solve this I had to use a video converter to drop the resolution and change the codec. I used Magic Video Converter to lower it to 720 x 480 using a Divix codec this meant that the 30 second clip had dropped in size to arround 100mb which made it much easier to play as well as the quality being good enough for viewing.
I am unsure if this happened because of something I missed but I spent a long time and many repeated renderings trying to solve the situation and this was the only solution I came up with. In this day a 16:9 picture should be standard as any digital television or monitor will now be in a 16:9 widescreen format.
Animating Part 5
The Final Sequence
For the final sequence I wanted to make the Death Star Explode.
I looked up multiple tutorials for this and found two different methods.
The first was was using a MeshBomb
And the second was using a Parray.
The MeshBomb uses a Force and pushes fragments of the mesh outwards. The Idea is that you can adjust the settings to create a nice effect using this feature but no matter what I changed in the features all the fragments did were spin in one position and the model didnt really 'explode' at all it just broke into small pieces and then started spinning. I followed the tutorial perfectly but yet couldn't figure out why it wasn't working.
Instead of spending all my time trying to figure out the problem I went on the hunt for another method of doing this. I found a tutorial on using something called a Parray. This was found under the Particle systems and it essentially did exactly what the MeshBomb should have been doing but with a much simpler method.

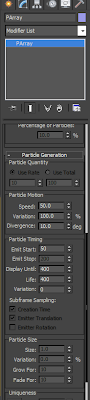
After connecting the Parray to the object I wanted to destroy I was able to change simple settings about the object such as the size of the fragments, speed and when the explosion starts and stops.
The one problem that this effect had on the model was that it essentially clones the model and destroyed that, as you can see below that after the object had shattered it is still clearly visible underneath. To solve this I used the same method as I did for the lasers, I made the Death Star only visible until the point where it starts to explode then it becomes invisible as if he really has exploded.

I chose to move the camera back out into space to get a full view of the Death Star being destroyed. This again shows how large the Death Star is and how bit the explosion was in comparison.

As the Death Star starts to explode the viewer is still unsure as to if the X Wing has survived or not and as the Death Star starts to explode it builds suspense until the point that a small X Wing becomes visible at the bottom of the Death Star and it comes flying towards the camera at full speed trying to escape the explosion.

Tuesday 13 December 2011
Animating Part 4
Fourth Part of the Animation
This is the most important of the whole animation as it is the point where the X Wing makes its final attack on the Death Star in an attempt to destroy it.
I chose to place a Free Camera behind the whole that the X Wing is going to shoot down. The camera has a direct view at the hole and highlights the fact that it is the target of the attack. This view also keeps the action look of the fight keeping the view of the Tie Fighter chasing the X Wing.

Once again I used lasers in this scene but this time the X Wing would be firing them into the hole.
I used exactly the same technique as I did with the Tie Fighter but this time the ship would be firing two lasers instead of one.

After the X Wing takes a direct shot at the hole it drastically pulls up in an attempt to flee the scene before the Death Star explodes. The Tie Fighter attempts to follow but is not prepared for the sudden escape attempt and flies out narrowly missing the camera.

This is the most important of the whole animation as it is the point where the X Wing makes its final attack on the Death Star in an attempt to destroy it.
I chose to place a Free Camera behind the whole that the X Wing is going to shoot down. The camera has a direct view at the hole and highlights the fact that it is the target of the attack. This view also keeps the action look of the fight keeping the view of the Tie Fighter chasing the X Wing.

Once again I used lasers in this scene but this time the X Wing would be firing them into the hole.
I used exactly the same technique as I did with the Tie Fighter but this time the ship would be firing two lasers instead of one.
After the X Wing takes a direct shot at the hole it drastically pulls up in an attempt to flee the scene before the Death Star explodes. The Tie Fighter attempts to follow but is not prepared for the sudden escape attempt and flies out narrowly missing the camera.

Animating Part 3
Third part of the Animation
For this sequence I wanted to use another action shot but this shot would also include the Tie Fighter chasing the X Wing.
As I did in the previous shot I grouped the camera to the X Wing but this time facing back on the X Wing so I could get the Tie Fighter in the same shot as it was chasing the X Wing.

The Tie Fighter comes on from out of the shot into the chase sequence. It follows a similar path to the X wing with a variation in speed. I felt having the camera in front of both the ships gave the most dramatic effect and it gives the viewer a true sense of the action in the chase.

This is one of the scenes where I chose to use the laser I had previously created. The Tie Fighter fires a laser at the X Wing but misses. As the laser was just a cylinder It had to be invisible in the scene until I needed it so what I had to do was place the laser in the scene at the point where I wanted the laser to fire out of the ship but then back track to the start of the timeline and change its settings so that it only became visible at the point the Tie Fighter met up with the cylinders in the scene. This gave the effect that they were being fired out of the ship rather than just appearing. After the laser has fired it has to travel at a speed faster than the moving ship so I had to make sure that its sequence was shorter than the other models in the scene and that it then went out of shot so it looked like it had disappeared.

Animating Part 2
Scene Two of the Animation
For the second part of the animation I wanted an action shot of the X Wing flying down into the main trench of the Death Star. I thought the best view would be a shot from just above the ship giving an idea of what it would look like from actually flying the ship.
Instead of just placing the camera behind the ship and moving both the camera and the ship separately through the animation I decided to group the camera and the ship together so I could move both object together at the same time. This also meant that the camera would always have the same view of the X Wing no matter what position it was in.

This is what the view from the camera looks like through this part of the animation. I think it gives a real action view and is more focused on what the X Wing is doing when preparing for battle.

When making an object move, 3DS Max automatically makes the object start off slow and then increase speed faster and faster the closer it gets to the finishing point. As my X Wing had already reached the speed I wanted I needed to change it as the final animation would look like it sped up then slowed down and sped up again. To solve this I used the curve editor to change the speed of the object. I selected the two points where the animation starts and stops and changed the graph so it was a straight line instead of a curved one, this meant that the ship would fly at a constant speed from start to stop.

Animating Part 1
Starting the Animation
Now I had all of my models textured and ready I could start animating.
I chose to do each scene separate using one camera at a time, this way I could render scenes a bit at a time and then use Adobe Premier Pro to add them all together in one clip.
I started with a pan starting by looking deep into space and slowly moving across to bring the Death Star into view. I chose to do it this way so It would give the viewer an idea of the size of the Death Star and how there was nothing else around it.
As the camera pans the X-Wing Fighter comes into view from underneath the camera slowly flying towards the Death Star preparing for battle. Having this view shows that the ship is clearly heading towards the Death Star and that it is going to attack. Using this method builds suspense as it is clear that something is about to happen.

As I was just panning I used a Free Camera as I had no particular object that needed to be in view and the camera needed to pan from viewing nothing through to two models. The X-Wing starts its animation at the same time as the camera starts panning but it isn't visible straight away as the model starts moving from a point behind the camera.

When the camera has finished panning it views the X fighter slowly flying towards the Death Star giving the viewer a feel for how big the Death Star is in comparison to the X Wing Fighter.

Creating a Laser
Implementing the laser tutorial
To start off with I used a small cylinder shape and gave it a white diffuse colour in the materials editor.

Using the Environment and Effects menu I added a lens effect with a glow.
I could then change the variables of the glow such as the size, intensity and the colour.
I chose to use a dark green colour for the glow as green is often the colour used in the actual film.

After playing with the settings this is the result I came up with. As this was a render effect it didn't show in the scene unless it was rendered.

To start off with I used a small cylinder shape and gave it a white diffuse colour in the materials editor.
Using the Environment and Effects menu I added a lens effect with a glow.
I could then change the variables of the glow such as the size, intensity and the colour.
I chose to use a dark green colour for the glow as green is often the colour used in the actual film.

After playing with the settings this is the result I came up with. As this was a render effect it didn't show in the scene unless it was rendered.
Laser effect video tutorial
I found a tutorial on YouTube about how to create a laser effect in 3DS Max. This would be very useful for my animation as the X-Wing needs to fire a laser into the Death Star to destroy it.
Basic Cameras
Camera Tutorial
There a two types of camera available in 3DS Max.
Target Camera:
This is used for looking at a direct point in a scene. For an example I can aim a Target Camera at the dolphin in the scene and set the target as the dolphin, this way I can set key frames in the animation where the camera is moved but the camera will always point at the dolphin.

Free Camera:
A Free Camera is used in a scene when the camera would just be having a view of what is in the scene and it wont follow any object. For an example placing a Free camera in the scene facing the dolphin will have a view of the dolphin but when the dolphin is moved it will be out of view and the camera would need to be manually moved to be able to see it again.

Monday 12 December 2011
Sky Dome
Creating the Sky Dome
This was the texture I chose for the Sky Dome, I picked this because it gives a great effect of space and as the Death Star is in space it gives a great feel of how vast and empty it is.
 Accessed 12/12/11 - http://media.bigoo.ws/content/background/space/space_154.gif
I used the same method as in the Sky Dome tutorial but as the Death Star is floating in space there was no ground as such so I needed an entire Geosphere instead of a Hemisphere so that space could be seen from every direction. I still used the NORMAL modifier to put the texture on the inside of the Geosphere and Flipped it.

I used a UVW map to change the way the texture was projected onto the Geosphere and I ended up using the 'Box' map as it projected the texture in the correct way to make it look best.

This gave a perfect looking scene for my attach on the Death Star.

This was the texture I chose for the Sky Dome, I picked this because it gives a great effect of space and as the Death Star is in space it gives a great feel of how vast and empty it is.

I used the same method as in the Sky Dome tutorial but as the Death Star is floating in space there was no ground as such so I needed an entire Geosphere instead of a Hemisphere so that space could be seen from every direction. I still used the NORMAL modifier to put the texture on the inside of the Geosphere and Flipped it.

I used a UVW map to change the way the texture was projected onto the Geosphere and I ended up using the 'Box' map as it projected the texture in the correct way to make it look best.
This gave a perfect looking scene for my attach on the Death Star.

Lighting Tutorial
Lighting Tutorial
Lighting is used to change the way object are lit in a scene. When applying a new light in the scene it will automatically turn off any default lighting that 3DS Max has put in.
Spot Light - Casts a light outwards in a cone shape.
Direct Light - Similar to a Spot Light but casts light out in one direction in a cylinder shape of a rectangle shape rather than a cone shape.
Omni Light - Casts the same amount of light in every direction.

For this tutorial I used an Omni Light, this casts light onto one side of the dolphin but disables any other light sources around it.
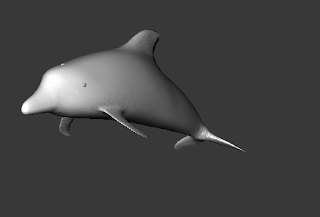
As you can see from looking at the opposite side of the dolphin there is no light sources behind it so therefor it is dark.

Lighting is used to change the way object are lit in a scene. When applying a new light in the scene it will automatically turn off any default lighting that 3DS Max has put in.
Spot Light - Casts a light outwards in a cone shape.
Direct Light - Similar to a Spot Light but casts light out in one direction in a cylinder shape of a rectangle shape rather than a cone shape.
Omni Light - Casts the same amount of light in every direction.
For this tutorial I used an Omni Light, this casts light onto one side of the dolphin but disables any other light sources around it.

As you can see from looking at the opposite side of the dolphin there is no light sources behind it so therefor it is dark.

Sky Dome Tutorial
Sky Dome Tutorial
As I needed a sky dome to put around the Death star to create the effect of space so I did the sky dome tutorial to learn how to do this correctly.
I started using a Geosphere which would go round the outside of all the models in the scene.

Changing the Geosphere to a hemisphere cuts the shape in half so that it only covers from the ground and not all the way underneath. The hemisphere needs to be set just lower than the ground so that the edges are not seen.

With my hemisphere set I needed to apply a texture to it. The problem is that if I apply a texture directly to it, the texture will be on the outside of the hemisphere. To solve this problem I needed to add a NORMAL modifier to it and enable the FLIP NORMAL option, this then puts the texture on the inside of the hemisphere instead of the outside.
To make the hemisphere more realistic it is a good idea to lower the top of the hemisphere. For this I will use an XFORM modifier, this allows it to be animated easier and it can be used to modify any layer in the stack. On the gizmo layer of the modifier the hemisphere is modified to look like this.

Death Star Texturing
Death Star Texture
This was the texture I used for the Death Star. It is a seamless tile which was perfect to use as it didn't leave an obvious line where the texture met up with itself.
This texture also defined the trenches in the Death Star which was useful as I could then Boolean out the trenches where they were on the texture.

For this model I wanted a quick way to cut into the texture to create an uneven effect as the Death Star isn't just a smooth sphere I wanted it to show where edges were cut out.
To achieve this I used a bump map, The bump map takes a texture and then allows you to either pull in or extrude the darker areas of the texture.

Loading the texture and then lowering the amount of the bump map down created the perfect uneven texture I was looking for. The problem I found with this was it didn't actually display the texture as well as the bump map so to solve this problem I also added the texture under the Diffuse Colour as well so that the texture was displayed as well as the bump map.
I also noticed that the bump map would only be displayed with the frame was rendered so when I was adjusting the height I had to keep rendering the image to check it was at the right height. As the model was a sphere I didn't need to bother with a UVW unwrap again as I could project the texture directly onto the model.

As the bump map only cuts into the model small amounts I had to manually cut out the bigger trenches. To to this I created large tubes that I could adjust to Boolean out small cuts all the way around the model. I also used a Mesh Smooth modifier to make the tubes have a much rounder shape.
I simply went round the model adjusting the size of the tube and cutting out each trench. It was essential that I got the Boolean size just right as the cuts were all at an angle, If they were too big It made the model look strange from a distance so this was a very long and tedious task.

With the laser of the Death Star I chose not to use a texture as it was a simple object that worked perfectly well with just a colour applied to it.

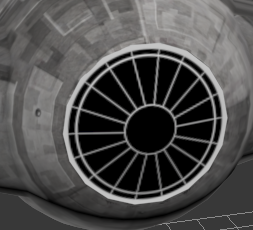
When creating the Death Star I had forgotten to create the main whole that the X Wing was going to shoot down to destroy it so I added this to the main trench by using a cylinder and Boolean it out.

Overall the Death Star was a simple object to create but as it was also going to be used as my landscape I had to make sure it had enough detail for this.
This is what the Death Star looked like without the bump map.

But when rendered you can clearly see how the bump map has affected the texture and it makes it look a lot more realistic.

Sunday 11 December 2011
Tie Fighter Texturing
Texturing the Tie Fighter
This was the texture I chose to use for the main body of the Tie Fighter.

Accessed 10/12/11 - http://www.kaneva.com/mykaneva/PictureDetail.aspx?assetId=6231784
As I wanted the texture to just wrap around the body I didn't need to use a UVW map as I didn't need to texture individual parts. So I simply used the material editor to project the texture directly onto the body.

For the wings of the Tie fighter I needed to use Photoshop to manually draw the texture on. So I used the same process as I did for the X Wing and exported a UVW unwrap that I could use in Photoshop.

To create the texture for the wings I used a dark black for the main colour of the wings and then layed grey lines over the top to create a similar effect that the Tie Fighter has.
I also added grey rectangles over the edges of the wings to replicate the sides.

When I was happy with the texture I used the materials editor to put the UVW unwrap back onto the model and it looked like this.

I used exactly the same procedure with the window that was in the main body of the Tie Fighter.

I used a large white circle for the outer ring and then put another slightly smaller circle inside that with a black colour to create the window. Then I used white lines on top of that to define the edges of the frame.

When put back onto the model it looked like this. Doing it this way clearly defined the window so it didn't look merged with the main material.
This gave me a final model that I was happy with and was ready to use it in my main animation.


This was the texture I chose to use for the main body of the Tie Fighter.

Accessed 10/12/11 - http://www.kaneva.com/mykaneva/PictureDetail.aspx?assetId=6231784
As I wanted the texture to just wrap around the body I didn't need to use a UVW map as I didn't need to texture individual parts. So I simply used the material editor to project the texture directly onto the body.
For the wings of the Tie fighter I needed to use Photoshop to manually draw the texture on. So I used the same process as I did for the X Wing and exported a UVW unwrap that I could use in Photoshop.

To create the texture for the wings I used a dark black for the main colour of the wings and then layed grey lines over the top to create a similar effect that the Tie Fighter has.
I also added grey rectangles over the edges of the wings to replicate the sides.

When I was happy with the texture I used the materials editor to put the UVW unwrap back onto the model and it looked like this.
I used exactly the same procedure with the window that was in the main body of the Tie Fighter.

I used a large white circle for the outer ring and then put another slightly smaller circle inside that with a black colour to create the window. Then I used white lines on top of that to define the edges of the frame.

When put back onto the model it looked like this. Doing it this way clearly defined the window so it didn't look merged with the main material.
This gave me a final model that I was happy with and was ready to use it in my main animation.


Subscribe to:
Posts (Atom)